An introduction which may be safely skipped
A desire for personal custom keyboard layout is not very common. Nevertheless, it is in no sense unique. Such the desire is usually inherent to multilingual persons including programmers, translators, journalists, (archeo-) linguists and/or people whose keyboards lack extra characters they actually need.
Can not resist to tell my own story. Hopefully, you may find it curious enough. I used to type a lot in several languages. Four-finger typing became a considerable burden really soon and the task of teaching myself touch-typing using optimal keyboard layout became really urgent.
It is widely known that qwerty layout is not optimal for typing. “Dvorak” layout for the English language is considered to be much better. Obviously, “Dvorak” layout is not expected to be optimal for other languages. That is why I have gathered a body of texts in my languages, processed them to extract characters’ and character combinations’ frequencies and applied Dvorak’s principles to compose (hopefully efficient) keyboard layout for myself.
Having enough actual experience in touch-typing using the first variant of my layout I somewhat corrected it to rebalance stress on the right and left wrists and different fingers. Very soon I could not believe I managed to live without my layout and touch-typing wasting time at keyboard in vain. And I still enjoy my layout.
Generally, you prepare your keyboard layout description file and add your keyboard layout to the list of available keyboard layouts. N.B. Superuser privileges required.
- Compose your keyboard layout like this:
- Consult yourself with characters and keyboard keys naming conventions by reading symbol files for your language in
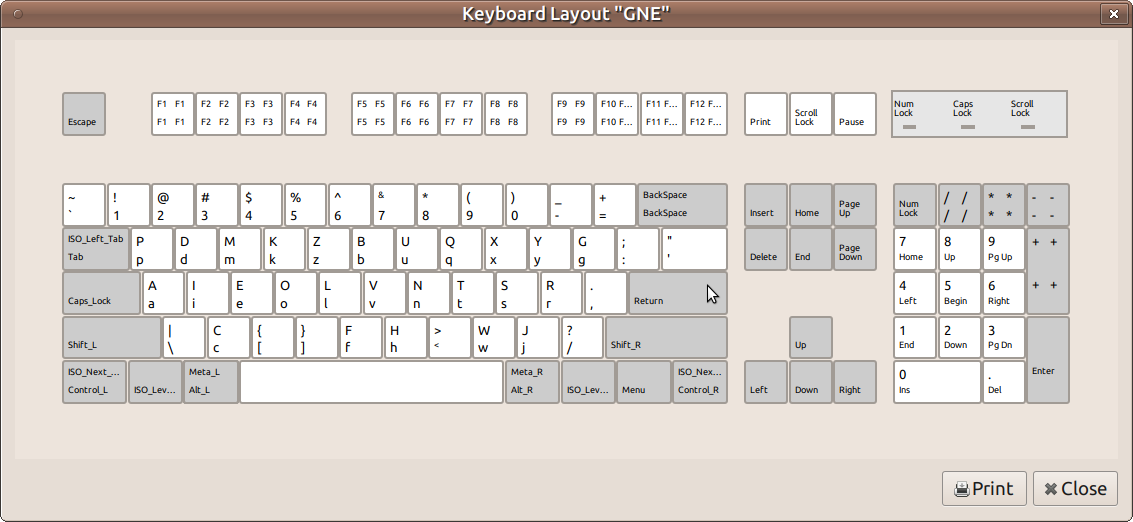
/usr/share/X11/xkb/symbolsdirectory. Please note, that symbol files do not necessarily denote alphabetic characters as you see them typed. Note that keyboard physical keys are assigned specific codes as follows:
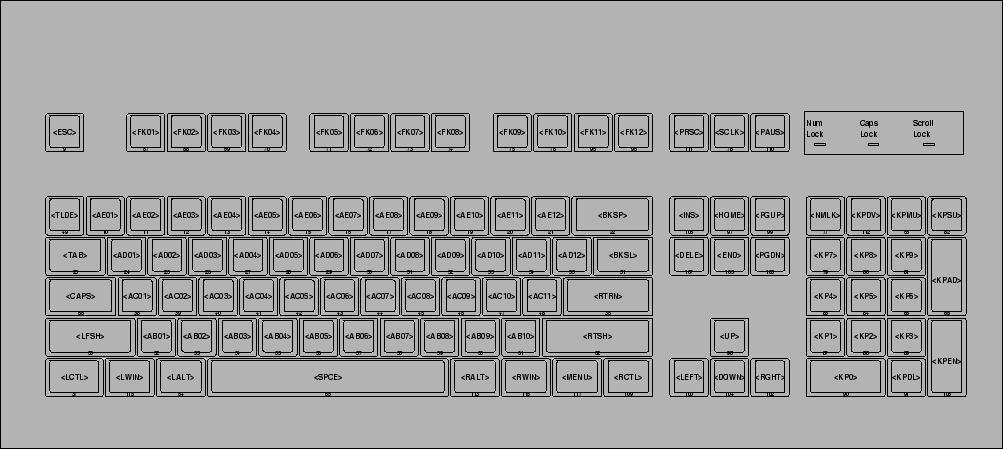
Key definition key <AD01> { [ p, P ] }; is straightforward. It means that a press on <AD01> physical key will normally emit lower-case ‘p’ character. Upper-case character ‘P’ will be emitted when <AD01> will be pressed while <shift> physical key will be held down. <Shift> key is addressed as a modifier key. N.B. <capslock> reverses modifier action.
Key definition key <AD01> { [ q, Q, at, Greek_OMEGA ] }; introduces another modifier. That is a press on <AD01> physical key will normally emit lower-case ‘q’ character. Upper-case character ‘Q’ will be emitted when <AD01> will be pressed while <shift> physical key will be held down.
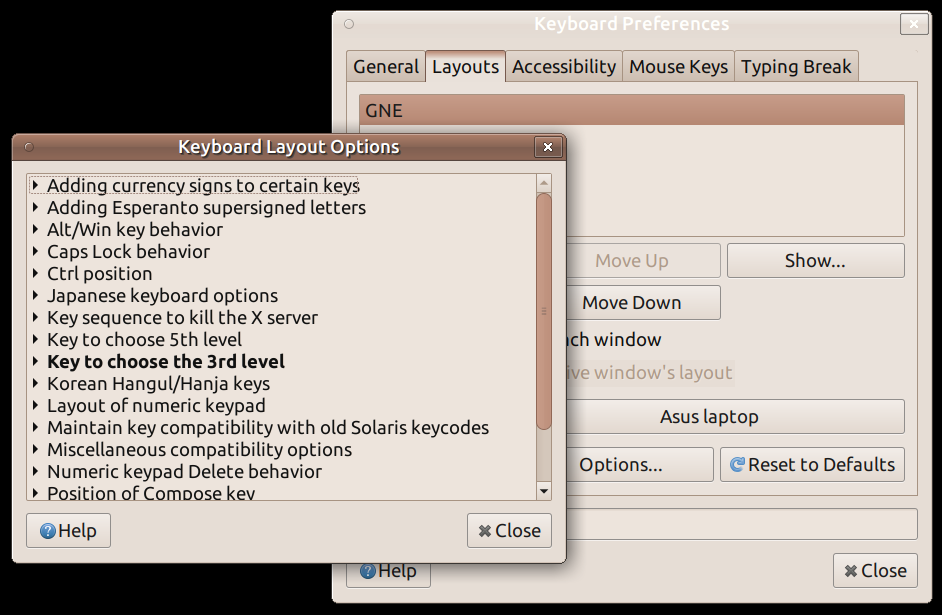
Similarly, a press on <AD01> physical key will emit ‘@’ or ‘greek omega’ characters depending on the modifier state provided that the extra modifier key will be held down. Such a modifier key is addressed as 3rd level chooser. You can select this extra modifier key according to your taste later in system preferences. Say, in System > Preferences > Hardware > Keyboard > Options for Mate Desktop.
-
Choose a short abbreviated name for your layout. “GNE” name is used in examples below.
-
Create empty layout description file named after the short name of your layout. Open the file and paste the following template code into it. Surely, you may find it more convenient to paste key definitions from symbol file for your language instead.
//   GNE         UGNVS, English

default partial alphanumeric_keys
xkb_symbols "basic" {

    name[Group1]= "GNE";

    // Alphanumeric section
    key <TLDE> {	[     grave,	asciitilde	]	};
    key <AE01> {	[	  1,	exclam 		]	};
    key <AE02> {	[	  2,	at		]	};
    key <AE03> {	[	  3,	numbersign	]	};
    key <AE04> {	[	  4,	dollar		]	};
    key <AE05> {	[	  5,	percent		]	};
    key <AE06> {	[	  6,	asciicircum	]	};
    key <AE07> {	[	  7,	ampersand	]	};
    key <AE08> {	[	  8,	asterisk	]	};
    key <AE09> {	[	  9,	parenleft	]	};
    key <AE10> {	[	  0,	parenright	]	};
    key <AE11> {	[     minus,	underscore	]	};
    key <AE12> {	[     equal,	plus		]	};

    key <AD01> {	[	  p,	P 		]	};
    key <AD02> {	[	  d,	D		]	};
    key <AD03> {	[	  m,	M		]	};
    key <AD04> {	[	  k,	K		]	};
    key <AD05> {	[	  z,	Z		]	};
    key <AD06> {	[	  b,	B		]	};
    key <AD07> {	[	  u,	U		]	};
    key <AD08> {	[	  q,	Q		]	};
    key <AD09> {	[	  x,	X		]	};
    key <AD10> {	[	  y,	Y		]	};
    key <AD11> {	[	  g,	G		]	};
    key <AD12> {	[     colon,	semicolon	]	};

    key <AC01> {	[	  a,	A 		]	};
    key <AC02> {	[	  i,	I		]	};
    key <AC03> {	[	  e,	E		]	};
    key <AC04> {	[	  o,	O		]	};
    key <AC05> {	[	  l,	L		]	};
    key <AC06> {	[	  v,	V		]	};
    key <AC07> {	[	  n,	N		]	};
    key <AC08> {	[	  t,	T		]	};
    key <AC09> {	[	  s,	S		]	};
    key <AC10> {	[ 	  r,	R		]	};
    key <AC11> {	[     comma,	period		]	};

    key <AB01> {	[ backslash,	bar 		]	};
    key <AB02> {	[	  c,	C		]	};
    key <AB03> {	[ bracketleft,	braceleft	]	};
    key <AB04> {	[ bracketright,	braceright	]	};
    key <AB05> {	[	  f,	F		]	};
    key <AB06> {	[	  h,	H		]	};
    key <AB07> {	[	  less,	greater		]	};
    key <AB08> {	[	  w,	W		]	};
    key <AB09> {	[	  j,	J		]	};
    key <AB10> {	[     slash,	question	]	};

    key <BKSL> {	[ apostrophe,	quotedbl	]	};

    // End alphanumeric section
};-
Substitute “GNE” with your layout short name in comment and
name[Group1]= "GNE";line. -
Edit key definitions and save your layout definition file.
-
Copy your finished symbol file into
/usr/share/X11/xkb/symbolsdirectory. -
Navigate to the directory
/usr/share/X11/xkb/rules. -
Open files
base.lstandevdev.lst. They are identical and you have to edit both of them identically. Find! layoutline and insert your own layout definition, e.g.GNE UGNVS ENGLISHbelow. -
Open files
evdev.xmlandbase.xml. They are identical and you have to edit both of them identically. Find<layoutList>line and insert your own layout definition below. For example:
    <layout>
      <configItem>
        <name>GNE</name>
        <shortDescription>GNE</shortDescription>
	  <description>UGNVS ENGLISH</description>
        <languageList><iso639Id>eng</iso639Id></languageList>
      </configItem>
      <variantList/>
    </layout>
Please do not forget to enter the short name of your layout and its description instead of those provided in the example. Pay attention to correctly denote your language abbreviation as well.
-
Be warned however, that
base.lst,evdev.lst,evdev.xmlandbase.xmlmay be sometimes overwritten during distribution version upgrades. As a result your keyboard layout may disappear from selection list. -
Select and instantiate your new keyboard layout. Say, using
System > Preferences > Hardware > Keyboard > Layouts > Adddialogue in Mate Desktop. Tip: search your layout by language.
Happy typing!