Memory at 99% CPU1, memory hogging

Hayden,

Shouldn’t Oswald also enter the following before the update-grub?

sudo update-initramfs -u -k all


Oswald,

Can you try controlling the CPU frequency directly? The following script should work for you.


From what I see, the frequency values that should be reported for pstates for your CPU (Intel Core i7-1185G7) are

  •  400 MHz
  • 1200 MHz
  • 3000 MHz
  • 4800 MHz

If you try the command
sudo HW_Admin__Power_SetFreqCPU.sh --status

you should get a report that looks something like this:

2026-05-27 20:37:32|  CPU 0:  userspace  1400 MHz [800 <-> 2600]
2026-05-27 20:37:32|  CPU 1:  userspace  1400 MHz [800 <-> 2600]
2026-05-27 20:37:32|  CPU 2:  userspace  1400 MHz [800 <-> 2600]
2026-05-27 20:37:32|  CPU 3:  userspace  1400 MHz [800 <-> 2600]

If you enter the command
HW_Admin__Power_SetFreqCPU.sh --fmidlo

that will set your frequency on all 8 CPUs to 1200 MHz, and should report as follows:

2026-05-27 20:37:32|  CPU 0:  userspace  1200 MHz [400 <-> 4800]
2026-05-27 20:37:32|  CPU 1:  userspace  1200 MHz [400 <-> 4800]
2026-05-27 20:37:32|  CPU 2:  userspace  1200 MHz [400 <-> 4800]
2026-05-27 20:37:32|  CPU 3:  userspace  1200 MHz [400 <-> 4800]
2026-05-27 20:37:32|  CPU 4:  userspace  1200 MHz [400 <-> 4800]
2026-05-27 20:37:32|  CPU 5:  userspace  1200 MHz [400 <-> 4800]
2026-05-27 20:37:32|  CPU 6:  userspace  1200 MHz [400 <-> 4800]
2026-05-27 20:37:32|  CPU 7:  userspace  1200 MHz [400 <-> 4800]

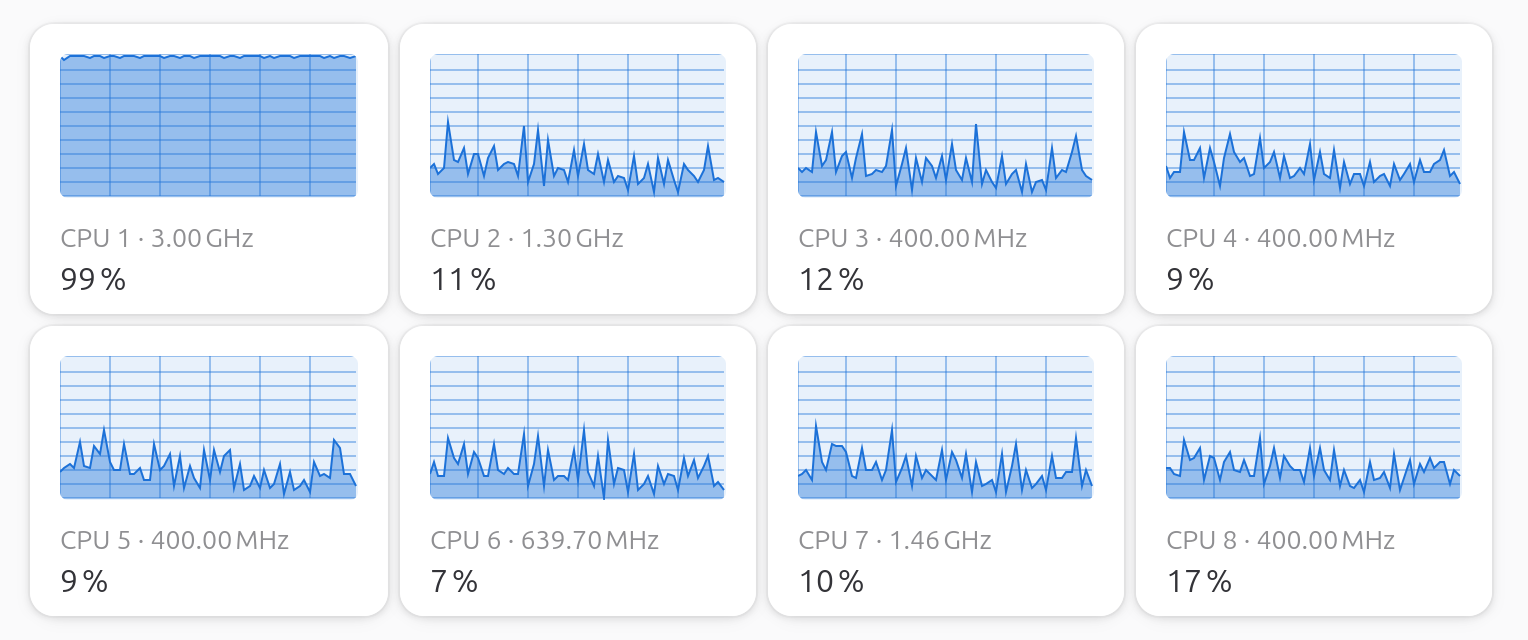
IF your charts monitoring the CPUs reflect no change, I don’t know what to try next.


For your GRUB file, you might want to consider setting the following with values suited to your preferences:
# Explicitly force graphics terminal
GRUB_TERMINAL=gfxterm

# Explicitly specify the choices for the resolution and colour depth for your display
GRUB_GFXMODE="1920x1080x32,1600x900x32,auto"

# Set to keep to pass on any resolution/graphics mode
GRUB_GFXPAYLOAD_LINUX="keep"

# Customize boot-time "Splash" graphics (a.k.a like a reseller's logo)
GRUB_BACKGROUND="/boot/grub/BG__Login_00__Ubuntu-MATE_WordMark_Modifiedv2_1440x900.png"


###
###	BOOT Menu Color Styling	**  Note: run 'update-grub' update grub for these changes to apply.
###
###	Line that is not currently selected (FG/BG)
GRUB_COLOR_NORMAL="yellow/black"

###	Line that is selected (FG/BG)
GRUB_COLOR_HIGHLIGHT="black/yellow"

###	Background for selection menu => specified image.
GRUB_MENU_PICTURE="/boot/grub/BG__Login_00__Ubuntu-MATE_WordMark_Modifiedv2_1440x900.png"

NOTE: The background should be sized for your screen resolution.

2 Likes

Thanks. Look at the end of your paste. There’s a stray x X at the bottom of the file (2 lines), that’s what’s causing /etc/default/grub: x: not found. Bash is trying to execute x as a command.

Probably happened during save and exiting:

If you backspace those two x’s out, then save, you can try again.

2 Likes

@ericmarceau Thanks for taking a look into this as well. Appreciated. Good question on update-initramfs. In this case from my understanding no, you only need update-grub for kernel command line changes.

update-initramfs is for when you’ve changed something that gets baked into the initramfs itself, so like crypto modules, encryption setup, or firmware. Doesn’t hurt, but just not necessary to introduce for kernel command line edit.

The issue looks to be the stray ‘x’ and ‘X’ at the end.

1 Like

Sadly I cannot find an x or X sorry

2 Likes

No worries @oswald_carter Try to run this command to see only the last few lines of the file:

tail /etc/default/grub

Paste the output here again so we can view.

The stray x X was definitely there in your earlier paste, so it’s either still there, got removed already or somehow inserted in the middle of your paste before the prompt line at the end.

Let’s see what the file actually looks like now with that output.

This may end up being a story to add here: The truth behind AI (hacker) koan: it’s real. :slight_smile:

1 Like

okay I have found the xX how do I get rid of them…

2 Likes

Which editor are you using?

1 Like

I’m scared to go down that rabbit hole :0)
I am using terminal which came this my copy of mint

1 Like

Open in nano again:

sudo nano /etc/default/grub

Use the arrow keys to move your cursor right after the X (at the end of that last line).

Then, press Backspace key until both the x and X and the space between them are gone. The line should be completely empty.

Then save with Ctrl+O, press Enter, and exit with Ctrl+X. If you press these shortcuts and there’s no response that means there’s a typo/mispress and it will end up typing inside the file. So be cautious.

Run update again:

sudo update-grub

and it should complete without errors this time.

1 Like

Terminal is just that, a terminal. It is not a text editor.

If you go

cd /etc/default

then enter

sudo vi grub

does the terminal display your grub file?

If so, type in the character “/” (which is a trigger to search for a string) then type in “x X”, then hit return. That should place your cursor on that line at the location of the string.

Then type in the character “d”, and again “d”.
That gives you 2 consecutive "d"s. That is the command sequence for delete the current line on which the cursor is located.

Then type in “:wq!”

That tells the system to save the file and exit.

1 Like

this was the reply
ossie@ossie-PORTEGE-X30L-J:~$ sudo nano /etc/default/grub
ossie@ossie-PORTEGE-X30L-J:~$ sudo update-grub
Sourcing file /etc/default/grub' Sourcing file /etc/default/grub.d/50_linuxmint.cfg’
Sourcing file `/etc/default/grub.d/98_mintsysadm.cfg’
Generating grub configuration file …
Found linux image: /boot/vmlinuz-6.17.0-29-generic
Found initrd image: /boot/initrd.img-6.17.0-29-generic
Found linux image: /boot/vmlinuz-6.17.0-23-generic
Found initrd image: /boot/initrd.img-6.17.0-23-generic
Found linux image: /boot/vmlinuz-6.17.0-22-generic
Found initrd image: /boot/initrd.img-6.17.0-22-generic
Found linux image: /boot/vmlinuz-6.17.0-20-generic
Found initrd image: /boot/initrd.img-6.17.0-20-generic
Found linux image: /boot/vmlinuz-6.17.0-19-generic
Found initrd image: /boot/initrd.img-6.17.0-19-generic
Found linux image: /boot/vmlinuz-6.17.0-14-generic
Found initrd image: /boot/initrd.img-6.17.0-14-generic
Found linux image: /boot/vmlinuz-6.14.0-37-generic
Found initrd image: /boot/initrd.img-6.14.0-37-generic
Warning: os-prober will be executed to detect other bootable partitions.
Its output will be used to detect bootable binaries on them and create new boot entries.
Found Windows Boot Manager on /dev/nvme0n1p1@/EFI/Microsoft/Boot/bootmgfw.efi
Adding boot menu entry for UEFI Firmware Settings …
done
ossie@ossie-PORTEGE-X30L-J:~$

1 Like

@ericmarceau I would rather not recommend vi which is what I use 100% of the time. It’s only simpler after experience with it. I wouldn’t really recommend it to start with.

nano is better and usually the default new for desktop users.

Someone told me one time they had to reboot a server because they tried vi via SSH and could not figure out how to close it. :grin: We younger guys were able to avoid vi in the beginning and then go back to it later.

1 Like

Will I continue to reboot?

@oswald_carter Nice! That worked clean this time.

No errors and your new boot config is now in place. Reboot, unplug the charger, and let us know if CPU1 still pegs at 98% on battery. Which is really what we are hoping will be solved. :four_leaf_clover:

1 Like

thanks fingers crossed

2 Likes

Oswald, there is no real need to keep that many old kernels around. Those should be periodically purged.

I suggest you have a look at what I shared in another post:

In case you might have missed them, I made some additional suggestions for changes that you might want to make to your GRUB file in my earlier post.

1 Like


Sadly no

thanks I will have a read

Would you consider trying that script I offered earlier to manually control the CPU frequencies?

1 Like

The bright side is it booted! :rofl:

Okay so PSR wasn’t it. arrg.

Run this while CPU1 is pegged (on battery):

top -o %CPU

Press 1 after it opens to show all cores. Look at the top of the list, whatever process is at the top is the culprit. Take a screenshot of top including that process and post it here.

If it shows something in square brackets like [kworker/1:2+events], that’s a kernel worker thread and the tag after the + tells us which subsystem is misbehaving. If it’s a normal process name, then it should be easier to track down.

1 Like